14 KiB
Google Cloud Usage Tutorial
This document has been created to help you setup a google cloud instance to be used for the MLP course using the student credit the course has acquired. This document is non-exhaustive and many more useful information is available on the google cloud documentation page. For any question you might have, that is not covered here, a quick google search should get you what you need. Anything in the official google cloud docs should be very helpful.
| WARNING: Read those instructions carefully. You will be given 50$ worth of credits and you will need to manage them properly. We will not be able to provide more credits. |
|---|
To create your account and start a project funded by the student credit
- Login with your preferred gmail id to google cloud console. Click on
Console(upper right corner), which would lead you to a new page and once there, click on Select a Project on the left hand side of the search bar on top of the page and then click on New Project on the right hand side of the Pop-Up. Name your project sxxxxxxx-MLPractical - replacing the sxxxxxxx with your student number. Make sure you are on this project before following the next steps. - Get your coupon by following the instructions in the coupon retrieval link that you received.
- Once you receive your coupon, follow the email instructions to add your coupon to your account.
- Once you have added your coupon, join the MLPractical GCP Google Group using the same Google account you used to redeem your coupon. This ensures access to the shared disk images.
- Make sure that the financial source for your project is the MLPractical credit. You can check this by going to the Google Cloud Console and selecting your project. Then, click on the
Billingtile. Once on theBillingpage, you should be prompted to add the billing account if you haven't yet done so. ChooseBilling Account for Educationas your billing account. Then, under the billing account, clickaccount managementon the left-hand side tab. You should see your project underProjects linked to this billing account. If not, you can add it by clicking onAdd projectsand selecting your project from the list of available projects.
To create an instance
- On the console page, click the button with the three lines at the top left corner.
- In the
Compute Enginesub-menu selectVM Instances. - Enable
Compute Engine APIif prompted. - Click the
CREATE INSTANCEbutton at the top of the window. - Click on
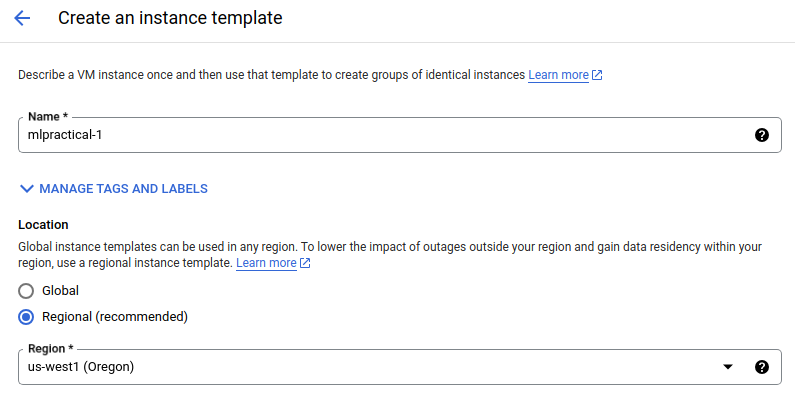
VM FROM INSTANCE TEMPLATE, and create your VM template for this coursework: - Name the template
mlpractical-1. - Select
Regionalas the location type andus-west1(Oregon)as the region.
- Under
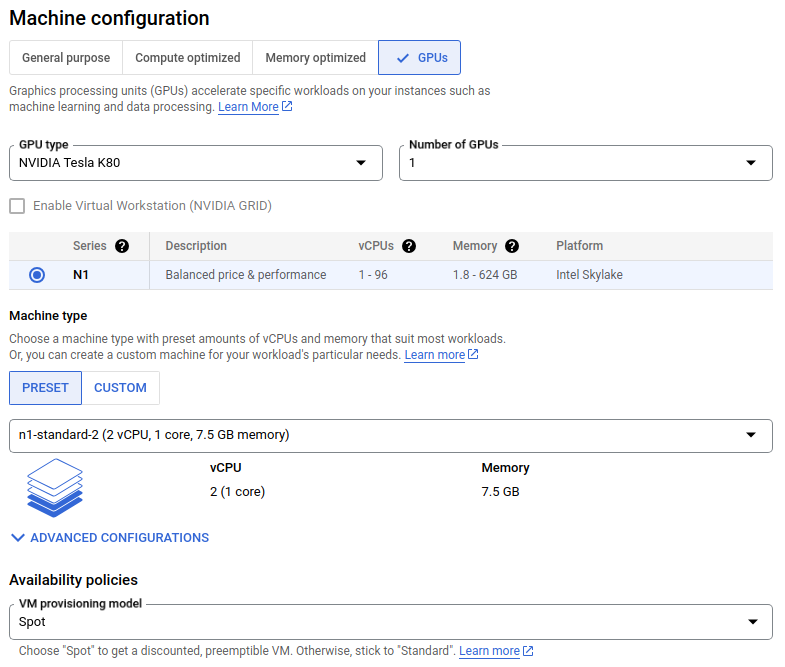
Machine Configuration, selectGPUmachine family. Select one NVIDIA T4. Those are the cheapest one, be careful as others can cost up to 8 times more to run. - Below, in
Machine type, underPRESETselectn1-standard-2 (2 vCPU, 1 core, 7.5Gb memory).
- Under
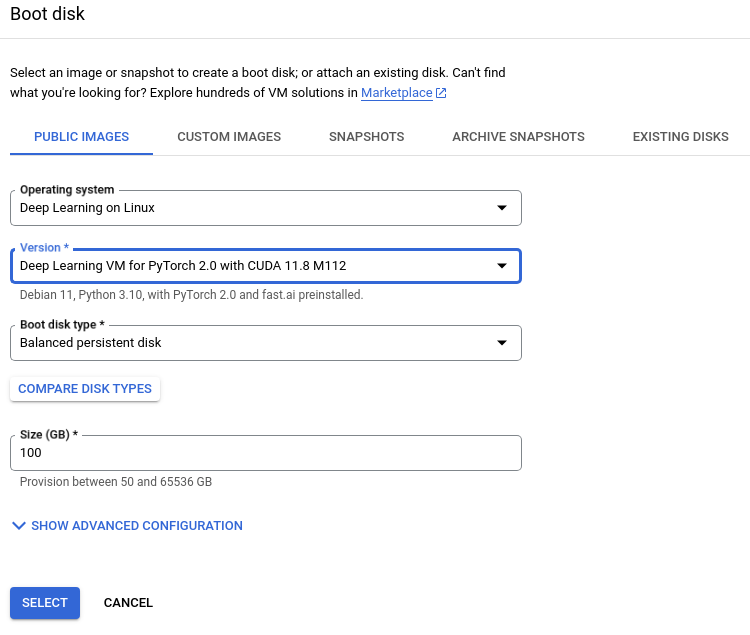
Boot disk, click change. - On the right-hand new menu that appears (under
PUBLIC IMAGES), selectDeep Learning on Linuxoperating system,Deep Learning VM for PyTorch 2.0 with CUDA 11.8 M125- Note: If the above version is not available, you can use any
Deep Learning VM for PyTorch 2.0 with CUDA 11.8 M***instead.
- Note: If the above version is not available, you can use any
Balanced persistent diskas boot disk type,100GB as disk size, and then click select at the bottom.
- Under
Availability policies, in theVM provisioning modeldrop down menu, selectSpot. Using this option will be helpful if you're running low on credits. - You can
Enable display deviceif you want to use a GUI. This is not necessary for the coursework. - Leave other options as default and click
CREATE. - Tick your newly created template and click
CREATE VM(top centre). - Click
CREATE. Your instance should be ready in a minute or two. - If your instance failed to create due to the following error -
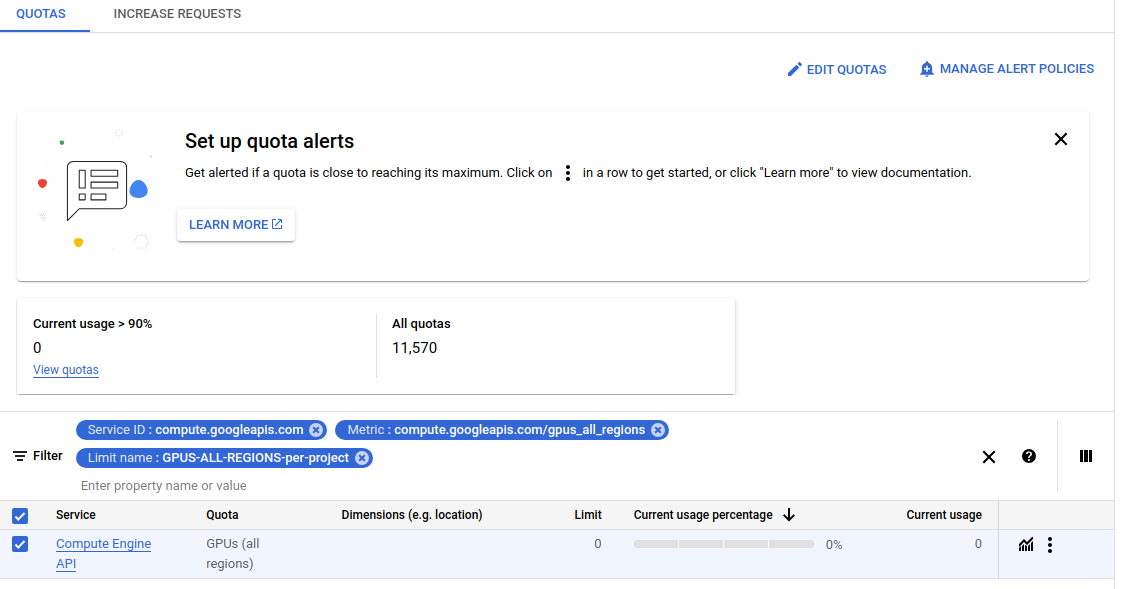
The GPUS-ALL-REGIONS-per-project quota maximum has been exceeded. Current limit: 0.0. Metric: compute.googleapis.com/gpus_all_regions., click onREQUEST QUOTAin the notification. - Tick
Compute Engine APIand then clickEDIT QUOTAS(top right).
- This will open a box in the right side corner. Put your
New Limitas1and in the description you can mention you need GPU for machine learning coursework. - Click
NEXT, fill in your details and then clickSUBMIT REQUEST. - You will receive a confirmation email with your Quota Limit increased. This may take some minutes.
- After the confirmation email, you can recheck the GPU(All Regions) Quota Limit being set to 1. This usually shows up in 10-15 minutes after the confirmation email.
- Retry making the VM instance again as before, by choosing your template, and you should have your instance now.
Note
Be careful to select 1 x T4 GPU (Others can be much more expensive).
You only have $50 dollars worth of credit, which should be about 6 days of GPU usage on a T4.
To login into your instance via terminal:
-
Install
google-cloud-sdk(or similarly named) package using your OS package manager -
Authorize the current machine to access your nodes run
gcloud auth login. This will authenticate your google account login. -
Follow the prompts to get a token for your current machine.
-
Run
gcloud config set project PROJECT_IDwhere you replacePROJECT-IDwith your project ID. You can find that in the projects drop down menu on the top of the Google Compute Engine window; this sets the current project as the active one. If you followed the above instructions, your project ID should besxxxxxxx-mlpractical, wheresxxxxxxxis your student number. -
In your compute engine window, in the line for the instance that you have started (
mlpractical-1), click on the downward arrow next toSSH. ChooseView gcloud command. Copy the command to your terminal and press enter. Make sure your VM is up and running before doing this. -
Don't add a password to the SSH key.
-
On your first login, you will be asked if you want to install nvidia drivers, DO NOT AGREE and follow the nvidia drivers installation below.
-
Install the R470 Nvidia driver by running the following commands:
- Add "contrib" and "non-free" components to /etc/apt/sources.list
sudo tee -a /etc/apt/sources.list >/dev/null <<'EOF' deb http://deb.debian.org/debian/ bullseye main contrib non-free deb-src http://deb.debian.org/debian/ bullseye main contrib non-free EOF- Check that the lines were well added by running:
cat /etc/apt/sources.list- Update the list of available packages and install the nvidia-driver package:
sudo apt update sudo apt install nvidia-driver firmware-misc-nonfree -
Run
nvidia-smito confirm that the GPU can be found. This should report 1 Tesla T4 GPU. if not, the driver might have failed to install. -
To test that PyTorch has access to the GPU you can type the commands below in your terminal. You should see
torch.cuda_is_available()returnTrue.pythonimport torch torch.cuda.is_available()exit() -
Well done, you are now in your instance and ready to use it for your coursework.
-
Clone a fresh mlpractical repository, and checkout branch
mlp2024-25/mlp_compute_engines:git clone https://github.com/VICO-UoE/mlpractical.git ~/mlpractical cd ~/mlpractical git checkout mlp2024-25/mlp_compute_enginesThen, to test PyTorch running on the GPU, run this script that trains a small convolutional network on EMNIST dataset:
python train_evaluate_emnist_classification_system.py --filepath_to_arguments_json_file experiment_configs/emnist_tutorial_config.jsonYou should be able to see an experiment running, using the GPU. It should be doing about 260-300 it/s (iterations per second). You can stop it when ever you like using
ctrl-c.
If all the above matches what’s stated then you should be ready to run your experiments.
To log out of your instance, simply type exit in the terminal.
Remember to stop your instance when not using it. You pay for the time you use the machine, not for the computational cycles used.
To stop the instance go to Compute Engine -> VM instances on the Google Cloud Platform, slect the instance and click Stop.
Future ssh access:
To access the instance in the future simply run the gcloud command you copied from the google compute engine instance page.
Copying data to and from an instance
Please look at the transfering files to VMs from Linux, macOS and Windows and google docs page on copying data. Note also the link on the page for seting up your SSH keys (Linux or MacOS).
To copy from local machine to a google instance, have a look at this stackoverflow post.
Running experiments over ssh:
If ssh fails while running an experiment, then the experiment is normally killed.
To avoid this use the command screen. It creates a process of the current session that keeps running whether a user is signed in or not.
The basics of using screen is to use screen to create a new session, then to enter an existing session you use:
screen -ls
To get a list of all available sessions. Then once you find the one you want use:
screen -d -r screen_id
Replacing screen_id with the id of the session you want to enter.
While in a session, you can use:
ctrl+a+escTo pause process and be able to scroll.ctrl+a+dto detach from session while leaving it running (once you detach you can reattach usingscreen -r).ctrl+a+nto see the next session.ctrl+a+cto create a new session.
You are also free to use other tools such as nohup or tmux. Use online tutorials and learn it yourself.
Troubleshooting:
| Error | Fix |
|---|---|
ERROR: (gcloud.compute.ssh) [/usr/bin/ssh] exited with return code [255]. |
Delete the ssh key files and try again: rm ~/.ssh/google_compute_engine* |
"Mapping" error after following step 3 (tar zxvf google-cloud-sdk-365.0.0-linux-x86_64.tar.gz; bash google-cloud-sdk/install.sh) |
This is due to conflicts and several packages not being installed properly according to your Python version when creating your Conda environment. Run conda create --name mlp python=3.9 to recreate the environment supported with Python 3.9. Then, activate the environment conda activate mlp and follow the instructions from step 3 again. |
"Mapping" error even after successfully completing steps 3 and 4 when using the gcloud command |
Restart your computer and run the following command: export CLOUDSDK_PYTHON="/usr/bin/python3" |
gcloud command not found |
Restart your computer and run the following command: export CLOUDSDK_PYTHON="/usr/bin/python3" |
module 'collections' has no attribute 'Mapping' when installing the Google Cloud SDK |
Install Google Cloud SDK with brew: brew install --cask google-cloud-sdk |
Access blocked: authorisation error in your browser after running gcloud auth login |
Run gcloud components update and retry to login again. |
ModuleNotFoundError: No module named 'GPUtil' |
Install the GPUtil package and you should be able to run the script afterwards: pip install GPUtil |
module mlp not found |
Install the mlp package in your environment: python setup.py develop |
NVIDIA-SMI has failed because it couldn't communicate with the NVIDIA driver. Make sure that the latest NVIDIA driver is installed and running. |
Remove the current driver by running: cd / and sudo apt purge nvidia-* Follow step 11 of the instructions or the following commands: (1) download the R470 driver wget https://us.download.nvidia.com/XFree86/Linux-x86_64/470.223.02/NVIDIA-Linux-x86_64-470.223.02.run, (2) change the file permissions to make it executable with chmod +x NVIDIA-Linux-x86_64-470.223.02.run and (3) install the driver sudo ./NVIDIA-Linux-x86_64-470.223.02.run |
module 'torch' has no attribute 'cuda' |
You most probably have a file named torch.py in your current directory. Rename it to something else and try again. You might need to run the setup again. Else import torch will be calling this file instead of the PyTorch library and thus causing a conflict. |
Finalizing NVIDIA driver installation. Error! Your kernel headers for kernel 5.10.0-26-cloud-amd64 cannot be found. Please install the linux-headers-5.10.0-26-cloud-amd64 package, or use the --kernelsourcedir option to tell DKMS where it's located. Driver updated for latest kernel. |
Install the header package with sudo apt install linux-headers-5.10.0-26-cloud-amd64 |


